Thursday, 1 August 2013

Collection of Keyboard Shortcuts for All Browsers

There Are Many Common Keyboard Shortcuts That Can Be Used In all Browsers, Whether You are using Google Chrome, Mozilla Firefox, Opera, Safari or Internet Explorer. I Use Keyboard Shortcuts , It Helps Me to Accomplish Many Tasks In Comparatively Less Time.


Following are Some Keyboard Shortcuts That You Can Use on Any Browser.

Managing Tabs


Ctrl+1-8 – Switch to the specified tab, counting from the left.

Ctrl+9 – Switch to the last tab.

Ctrl+Tab – Switch to the next tab – in other words, the tab on the right. (Ctrl+Page Up also works, but not in Internet Explorer.)

Ctrl+Shift+Tab – Switch to the previous tab in other words, the tab on the left. (Ctrl+Page Down also works, but not in Internet Explorer.)

Ctrl+W, Ctrl+F4 – Close the current tab.

Ctrl+Shift+T – Reopen the last closed tab.

Ctrl+T – Open a new tab.

Ctrl+N – Open a new browser window.

Alt+F4 – Close the current window. (Works in all applications.)

Managing Tabs With Mouse


Middle Click a Tab – Close the tab.

Ctrl+Left Click, Middle Click – Open a link in a background tab.

Shift+Left Click – Open a link in a new browser window.

Ctrl+Shift+Left Click – Open a link in a foreground tab.

Navigation


Alt+Left Arrow, Backspace – Back.

Alt+Right Arrow, Shift+Backspace – Forward.

F5 – Reload.

Ctrl+F5 – Reload and skip the cache, re-downloading the entire website

Escape – Stop.

Alt+Home – Open homepage.

Zooming


Ctrl and +, Ctrl+Mousewheel Up – Zoom in.

Ctrl and -, Ctrl+Mousewheel Down — Zoom out.

Ctrl+0 – Default zoom level.

F11 – Full-screen mode.

Scrolling


Space, Page Down – Scroll down a frame.

Shift+Space, Page Up – Scroll up a frame.

Home – Top of page.

End – Bottom of page.

Middle Click – Scroll with the mouse. (Windows only)

Address Bar


Ctrl+L, Alt+D, F6 – Focus the address bar so you can begin typing.

Ctrl+Enter – Prefix www. and append .com to the text in the address bar, and then load the website. For example, type Geekofreak into the address bar and press Ctrl+Enter to open www.geekofreak.com

Alt+Enter – Open the location in the address bar in a new tab.

Search


Ctrl+K, Ctrl+E – Focus the browser’s built-in search box or focus the address bar if the browser doesn’t have a dedicated search box. (Ctrl+K doesn’t work in IE, Ctrl+E does.)

Alt+Enter – Perform a search from the search box in a new tab.

Ctrl+F, F3 – Open the in-page search box to search on the current page.

Ctrl+G, F3 – Find the next match of the searched text on the page.

Ctrl+Shift+G, Shift+F3 – Find the previous match of the searched text on the page.

History & Bookmarks


Ctrl+H – Open the browsing history.

Ctrl+J – Open the download history.

Ctrl+D – Bookmark the current website.

Ctrl+Shift+Del – Open the Clear Browsing History window.

Other Functions


Ctrl+P – Print the current page.

Ctrl+S – Save the current page to your computer.

Ctrl+O – Open a file from your computer.

Ctrl+U – Open the current page’s source code. (Not in IE.)

F12 – Open Developer Tools. (Requires Firebug extension for Firefox.)

I Hope these Shortcuts will Help you Now and in Future. Stay Connected :) .
If any Of the Above Shortcut is not Working on Any Browser or if there is a Shortcut That you know and You Think is Missing In the Above list, Then Feel Free to Comment below. 

Find IMEI Number of a Lost Android Phone

As you probably already know, an IMEI number or the International Mobile Equipment Identity number is a 15 digit number which can be used to identify any mobile device uniquely. You can easily find the IMEI number of your mobile phone if you have it tight now, just dial *#06# and you will see it.
You should always write down the IMEI number of your mobile phone at a safe place. This is because if you ever loose your phone or if its stolen, you will need to use its IMEI number to track and find your lost or stolen mobile phone.
But what if your Android phone is already lost and you don’t have its IMEI number? Don’t worry, you can still find the IMEI number of your Android phone.
The first thing you may have done after buying your Android phone is adding your Google Account to your device. And you probably don’t know, but when you add your Google account to your Android phone, it saves all the details about your phone in its database, including the IMEI number of the phone. You can retrieve the IMEI number of your lost or stolen Android phone from your Google account easily.
Just sign in to your Google Dashboard, and scroll down a bit to find the ‘Android devices’ section. Here, you will see a list of all Android devices that you have used in past to login to your Google account, including your lost or stolen Android phone.

Find your lost Android phone in this list and click on ‘More data stored about this device’ option. You will immediately see the IMEI number of your lost or stolen Android phone.

Saturday, 27 July 2013

How to Use Internet on Computer via Android Phone

Hello, Today i Will Share a Trick by Which you can Use your Mobile Internet on your PC by just connecting both with USB.

Android Phones have become more Common and Famous Now a days, With Android Comes a Feature Called " Tethering " .

Tethering Allows us to use internet from your Android phone to your PC, So If you have a PC but don't have internet Connection, or Your Internet Connection is Disabled due to Any reason and have Internet Access on Your Android Phone, Then You can Tether Your android phone with your PC and start Using Internet. 

For your Better Understanding  i will show you Steps on how to Use this " Teather " Feature. 

Requirement : 
  1. Android Phone. 
  1. USB Cable.
How do I use my Mobile's Internet on my PC ?
Many tethering apps are available but here we will use " Tether " to tether your Android phone with Pc 
Step 1:  First of all Click here To Download Tether From the official site.

Step 2: Do not run Tether , first Connect Your Android phone with USB Cable, Make sure USB Debugging is Enabled on Your Phone.

Enable USB Debugging by navigating to Setting > Applications > Development > Tick usb Debugging.

Step 3: Now Run Tether.exe, while installing it may ask you to confirm a couple of time, Click yes and Trust. While installing Tether on your pc it will also install tether on your Phone, so Make sure your Mobile is Connected to your PC.

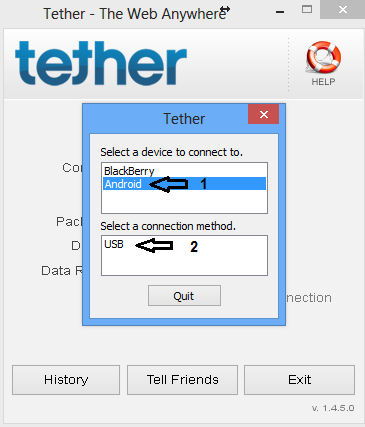
Step 4:  Once its installed, open Tether, click on Android and then USB just below it.


Step 5: Once It shows Connected to Android, You Can Launch your Favourite Browser and start Using Internet. 


 I have an easy method to do all that alternative to the above method.

In this method we will use " Easy Tether " Which You will have to download On your Mobile and not on your PC.


Step 1: Goto Google Play Store and Search For Easy tether, Download the Free Version on your Mobile.

Note: In Free version You won't be able to access websites which has secured connection. ie : https: 
So you cant access Facebook And Google, Which i Think is Most usefull. But you can buy full version of Easy Tether which costs around 9$ and enjoy all Websites.

Step 2:  After you download Easy Tether, Install it. Next step you will have to Install Easy Thether Drivers on your PC, Which Can be Done Here.

Step 3: After Download the Drivers  You will see a Tray Icon. Now Connect Your Android Phone With USB Cable,Enable USB Debugging, Then Goto the Tray Icon, Right Click on it and click on Connect Via Android.


Thats it, you will See Connection Established, Start Using Internet now.

Stay Connected For More Tricks :)

Thursday, 25 July 2013

Kite patch is claimed to make you "invisible" to mosquitoes

A proprietary blend of FDA-approved non-toxic ingredients within the patch exudes a scent that reportedly blocks mosquitoes’ ability to detect exhaled carbon dioxide

Depending on what part of the world you live in, mosquitoes can range from being an annoyance, to acting as carriers of life-threatening diseases such as malaria and West Nile virus. Sprays containing deet do a fairly decent job of keeping the mozzies at bay, but they’re also highly toxic. Less-nasty sprays, bracelets and other devices are also available, although (as I can attest to from personal experience) they tend not to be very effective. Now, however, a group of California-based entrepreneurs are developing what could be the ultimate deterrent – the Kite Mosquito Patch.

The Kite Mosquito Patch is worn on the clothing like a decal, and is said to keep mosquitoes from detecting your presence for up to 48 hours
Each disposable square patch measures just 1.5 inches (38 mm) per side, and is simply stuck onto the clothing like an adhesive decal. A proprietary blend of FDA-approved non-toxic ingredients within the patch then exudes a scent, that reportedly blocks mosquitoes’ ability to detect exhaled carbon dioxide – that’s the major method by which the insects track down their human prey.
Once exposed to the air, the patch remains effective for 48 hours.
The Kite is based on research that was initially carried out at the University of California, Riverside, where it received funding from the Bill and Melinda Gates Foundation and the National Institutes of Health (NIH). The company that was founded to develop the patch has also benefitted from an NIH grant, along with grants and collaborative agreements formed with other organizations.
Initial large-scale testing is planned to take place in Uganda, where disease-carrying mosquitoes are a major health issue. Ultimately, it is hoped that Kite patches will be widely available both to aid organizations, and to consumers around the world. It would be interesting to see if a patch worn on the shirt, for instance, is reallyeffective at keeping mosquitoes away from one’s legs and feet..

The Kite patch's active ingredients being tested in a lab
The Kite group is currently raising finds on Indiegogo, and has proven very successful. The funding goal of US$75,000 was met in just four days, with the total currently sitting at approximately $236,000. There’s still plenty of time to take part, however. A pledge of $10 will send a pack of five Kites to a family in Uganda, while $35 will send 10 patches and also get you 10 of your own. An estimated retail price has yet to be established.
More information on the Kite patch is available in the pitch video below.
Sources: KiteIndiegogo

Wednesday, 24 July 2013

BlackBerry A10 leaked pictures

Want to see what BlackBerry's upcoming high-end handset, dubbed the A10, will look like? According to VR-Zone, the leaked pictures show the handset's front and back sides. The pictures show a large 5-inch display on the A10. Other than this, however, there’s not much to see, since, the handset appears to follow the same design principle as the Z10. It is also a general consensus that the handset will be launched running BlackBerry 10.2 out of the box.


The large 5-inch display

Earlier this month, specifications of the handset had been leaked. And the information looked like it was a slide taken right off a BlackBerry presentation. One of the stand out new feature that we can see in the A10 is the massive battery. With 2,800 mAh of juice, the phone should have a fairly long battery life despite the larger 5-inch display. Other than this, we can now also see that the A10 measures 140.7x72x9.4 mm. However, the Verizon-only variant of the A10 seems to be thicker, measuring 9.7mm.


Cell Phone coverage

See the Actual Signal Strength on Your iPhone or Android

Ever feel tricked by your phone's signal bars into thinking you have a better reception that you actually do? This simple hack will transform those bars to show the actual signal in decibels (dBm). No jailbreaking is required and it's reversible.

Here are the instructions from TechGlitz:
Step 1: Dial *3001#12345#* on your iPhone then press Call.
Step 2: You'll now enter Field Test mode. You'll notice a signal strength indicator on the upper left hand corner of your screen. You can toggle between signal strength bars and a number by simply taping on it. At this point, press the home button to exit the app or if you would like the feature to be permanent, continue on. Don't worry, the process is completely reversible. 
Step 3: Hold down on the Power button until you see the ‘slide to power off' bar. Do not power off the device. 
Step 4: Press down on the Home button until the app closes and you return to your home screen. 
That's it. Even when restarting the iPhone, the signal strength can be toggled between bars and numbers. The closer your number is to zero, the stronger your signal is.
The lower your number, the stronger your signal—but don't include the - sign when evaluating (so, if the signal says -60, that's better than -90). 
To return to the default bars permanently, follow these steps:
Step 1: Dial *3001#12345#* on your iPhone then press Call.
Step 2: Press on your Home Button once.
This trick may come in handy when you're in a dead zone and need to know where to move to for a better signal. (If you're constantly suffering from poor signal woes)

By the way, Android users can take a look at their dBm number under Settings > About Phone (it may be under Network or Status, depending on your phone).

Wednesday, 17 July 2013

Trick to Speedup Pendrive for Faster Data Transfer Rate

Guys You must have Experienced That the Speed of Your Pendrive has Slow Down After Few Days Of Usage. So Today I will Show You some Effective Tricks to Speedup your Pendrive Data Transfer Rate.

First Thing First, Your pendrive Data Transfer Rate Depends On Some Factors Like :

1. Age of your Pendrive:

As i Said, When You buy a New Pendrive it works Fast but as it gets older, The Data Transfer Rate Starts Decreasing.

2. Types of Files :
Data Transfer Rate Depends on Types of Files You are Transferring. Songs, Docs, Videos May get Transferred very Quickly.

3.Location of Files :

Data Transfer Rate also depends on Locations of Files. If you want to transfer a bunch of files to Same Drive But another Folder then it will get Transferred very Fast. But if You want to Transfer Files from one Drive to another then it will Take some Time Comparatively. Likewise in Pendrive.

4. USB Port Version:

USB Port Version 2.0 is Most popular and the computers which are manufactured after year 2000 Have 2.0  Usb port Version. This version of USB port give you the Speed of 35mbps (Theortically)
How to Speedup your Pendrive For Faster Data Transfer:

We will Change The File System To NTFS of your pendrive and Also We will Change the Device Policy inorder To Speedup your Pendrive.

Follow Below Steps 

1: Plugin your Pendrive, Right click on your pendrive and select Format (You will Loose All your data in your pendrive so better Take a backup) Then,Select NTFS File system, Uncheck Quick Format And Click On Start.

Note: We Are Changing The File system to NTFS Because FAT 32 Can not Handle Large amount of data
2: After Formating Your Pendrive and Converting it To NTFS file System, Its now Time to Change the Device Policy.

Now Again Goto Your Pendrive Properties , click on  Hardware Tab. Select Your Usb Device from the list and click on Properties .


After Clicking on Properties You will see a new Dialog Box,Click on Change Settings, Another Dialog Box will appear.

Note :  Understand That After Changing the Device Policy , Your Data Transfer Speed Will Increase But Make Sure You Click on " Safely Remove Hardware and Eject Media"  Before Removing Your Pendrive.
Click on Policy Tab and Select Better Performance, Click ok .

Thats it. Restart Your Computer


Friday, 12 October 2012

Samsung announces Galaxy S III Mini smartphone


The Samsung Galaxy S III Mini

Samsung has announced its latest handset at a press event in Frankfurt, Germany. The four-inch Galaxy S III Mini is an Android-powered smartphone designed to provide a premium alternative to the company's larger Galaxy S III device.

The handset is aesthetically identical to the original Galaxy S III, albeit with a significantly reduced footprint (four inches compared to the original device's 4.8-inch effort). The internals, on the other hand, aren't quite on par with the flagship handset, featuring a dual-core CPU, 1GB RAM, up to 16 GB storage and a WVGA AMOLED (800 x 480) display. The Mini is also slightly thicker than its namesake, coming in at 9.85 mm.

 The handset is 9.85 mm thick

Despite the slightly disappointing specs, the Mini does boast some compelling features. The device will ship with Android 4.1 Jelly Bean, complete with the company's TouchWiz UI overlay which provides access to premium features such as the Siri-like S Voice. The handset also features NFC connectivity and a 5MP rear camera capable of recording 720p video. The Galaxy S III Mini will not have 4G LTE connectivity.

Aesthetically, the device is a miniaturized version of the popular Galaxy S III handset

Although the reduced screen size of the device may be appealing to many users, the performance premium here may make it difficult for it to compete with the iPhone 5, which features a similar (though much higher resolution) four-inch display. We're also not convinced that the device is deserving of the premium Galaxy S name, and there is potential that it may lead to a dilution of the premium perception of the brand.

There is currently no word on a release date or pricing for the device, but it's likely that it will hit a significantly lower price point than both the original Galaxy S III and the iPhone 5.

Source: Samsung

Sony Cyber-shot DSC-RX100 compact camera launched for Rs 34,990


ony has recently launched its flagship compact camera, the Cyber-shot DSC-RX100 camera in India. This model comes equipped with imaging features from Sony’s Alpha range of A-mount and E-mount cameras.

“This camera is ideal for travel, portraits or street photography, delivering impressive results in a variety of lighting conditions with an intuitive, customizable control interface,” said Yosuke Tomoda, director of the Cyber-shot business at Sony Electronics.  “It’s a perfect step-up model for point and shoot users not interested in larger DSLR or compact system cameras, and also an outstanding choice for enthusiasts who may already own a large DSLR and are looking for a high-quality, pocket-sized ‘all-in-one’ second camera.”

The Sony Cyber-shot RX100 features a 1.0-inch type Exmor CMOS sensor with a resolution of 20.2 megapixels. The sensor has an area that is approximately four times larger than the 1/2.3-type sensors in traditional point-and-shoot cameras. The sensor’s larger area helps in taking in a greater amount of light while capturing content. This can help in taking better images as well as videos that feature less image noise.


The larger sensor is partnered with a Carl Zeiss Vario-Sonnar T fixed lens with 3.6x optical zoom range. The camera features a wide F1.8 maximum aperture to let in additional light and complement the larger sensor.

The lens features a seven-bladed circular aperture. This makes it easy to produce images with subjects in focus against a smoothly-blurred, defocused background. The lens also features an Advanced Aspherical (AA) lens element that contributes to the camera’s compact dimensions without compromising an optical zoom performance or resolution.

The camera’s powerful BIONZ image processor maximises shooting response times while helping attain clean, natural images. It also extends sensitivity right up to ISO 25600 (using Multi Frame Noise Reduction), which allows for clear handheld images in low light conditions. To capture fast-moving subjects, the RX100 camera can also shoot at up to 10 frames per second (in full resolution) and has high-speed autofocus that locks onto a subject in as quickly as 0.13 seconds but this feature depends on scene and lighting conditions.

The new RX100 camera features a high-resolution 3-inch 1,229k dot Xtra Fine LCD display and also adds a new feature called WhiteMagic technology. This uses additional white pixels to boost screen brightness, allowing users to see subtle details and tones on the screen in all types of shooting environments, including outdoors in bright sunlight.

For making manual adjustments while shooting both still images and movies, the camera has a control ring around the lens body, which can be used to alter exposure, zoom, creative picture effects and a variety of other customizable functions. Additionally, frequently used functions can be assigned to the Fn button for instant access, and the Memory Recall feature can store up to three groups of customized shooting settings based on a user’s preference. 


There is a choice of auto and manual focus modes on the Cyber-shot RX100 camera for enhanced image control. For those that prefer focusing manually, MF Assist magnifies images to simplify fine adjustments.

The RX100 camera offers a range of choice of artistic options to expand creative shooting possibilities. It includes the option for six different creative styles and a variety of popular picture effects including Toy Camera, Partial Color, HDR Painting and several others.

The new Cyber-shot features Auto Portrait Framing – a feature found on Sony’s latest α range of A-mount and E-mount cameras, this makes it easier to create sharp, perfectly framed portraits. This feature automatically detects faces in a scene, crops the picture accordingly, and creates a composition at full resolution. Both the original and cropped photos are saved for review.

The Sony Cyber-shot DSC-RX100 is available in the market for Rs 34,990.

Top10 Firefox plugins - Firefox

These are the top 10 Firefox plugins

1. Adblock Plus:

If you have ever been annoyed by all those ads and banners on a site that often take longer to download than everything else on the page, install Adblock Plus and get rid of them. Right-click on a banner and choose "Adblock" from the context menu, and the banner won't be downloaded again.

2. Colorful Tabs:

This simple add-on makes a strong colorful appeal. It sets each tab to a different color and makes them easy to distinguish while beautifying the overall appearance of the interface. After a long day of research when you have lots of browser windows open, this makes online page viewing easier on the eyes.

3. ColorZilla:

ColorZilla puts an eyedropper icon in your status bar. Click it and you'll get a crosshair cursor. As you run this over a Web page, the RGB values of the pixel under the crosshair will display in the status bar, both as three separate values and as a hex value (e.g., R:255, G:255, B:255 | #FFFFFF). I use this all the time if I'm trying to match colors; i.e. a font color to an the primary background on an image, for example.

4. GMail Manager:

This Gmail notifier is great if you have multiple Gmail accounts. It allows you to receive new mail notifications along with viewing account details including unread messages, saved drafts, spam messages, labels with new mail, space used, and new mail snippets.

5. MeasureIt:

After installing this extension, you'll have a small ruler icon on the left side of your status bar. When you click on it, your browser window will fade out a little, and you'll have a crosshair cursor. Drag the cursor over a section of the screen that you want to measure. Next to the box is its height and width, measured in pixels. I use this all the time when trying to measure the size of images. When you're finished, just hit the Escape key to turn it off and return to normal viewing of the page.


6. Quirk Search Status:

Search Status allows you to see how any web site you visit is performing. When you land on a page, SearchStatus lets you view its Google PageRank, Google Category, Alexa popularity ranking, Compete.com ranking, SEOmoz Linkscape mozRank, Alexa incoming links, Alexa related links and backward links from Google, Yahoo! and MSN. This combined search-related information means you can view not only the link importance of a site (according to Google and Linkscape), but also its traffic importance (according to Alexa and Compete), so providing a balanced view of site efficacy. I use this all the time to determine whether a site has enough traffic to warrant accepting a joint venture proposal.

7. Scrapbook:

ScrapBook helps you to save Web pages and easily manage your saved collections. Major features are: saving web pages or snippets of a page, saving a web site, organizing the collection in the same way you do bookmarks, full text search and quick filtering search of the collection, and editing of your collected pages.
[Forget Expensive PPC Advertising - There is an Alternative!]

8. Session Manager:

Session Manager helps you manage your Firefox tabs. If you visit the same sites every day, all you need do is open all the sites in separate tabs and/or windows, and then use Session Manager to save the session with a distinct name. Then, you simply go to Tools > Session Manager, pick your session, and all the windows and tabs open up just as you saved them. And, Session Manager tracks your sessions as you surf, and if Firefox (or your system) crashes, you can recover the selection of tabs you had open when it crashed.

9. Tabs Open Relative:

Tabs Open Relative makes all new tabs open to the right of the current tab, rather than at the far right of the tab bar. This reduced a huge annoyance I had with how the Firefox browser worked.

10. XMarks:

XMarks (formerly Foxmarks) provides seamless bookmark synchronization between your computers and browsers via their synchronization server. Your bookmark (and optionally password) data is securely stored and backed up on their servers and is available online, as well. After you install the add-on, click on the notification to set up Xmarks and start backing up and synchronizing your bookmarks. Install Xmarks on each computer you use, and it seamlessly integrates with your web browser and keeps your bookmarks safely backed up and in sync across all of your computers. Secure Password Sync is an optional Xmarks feature.

Code to display the load time of your website

You need to know how long your site takes to load. Use this script to find out if your site is taking too long, and if it is, fix it.

Insert this code snippet inside the and tags of your document:

$starttime = microtime();
$startarray = explode(" ", $starttime);
$starttime = $startarray[1] + $startarray[0];


Insert this code snippet directly before the closing tag of your document:
$endtime = microtime();
$endarray = explode(" ", $endtime);
$endtime = $endarray[1] + $endarray[0];
$totaltime = $endtime - $starttime;
$totaltime = round($totaltime,10);
echo "Seconds To Load: ";
printf ("%f\n", $totaltime);

Select text Vertically in Word 2007 - MS Office

Almost everybody who writes their documents in Microsoft Word knows how to select the text horizontally. You have to select the text horizontally in order to delete, underline, italicize etc. But many times you face a situation in which you have to select the text vertically. For example you might have to delete the first few words in every line in a list in order to delete it. You need to do that as you reformat a Word document. Many people think that it is not possible to select text vertically in Word 2007 document. It is very easy to select text vertically in Word 2007. You just need to do this trick in order to make the vertical selection:

Point the mouse to the beginning of the text you want to select.

Hold down the Alt key.

Drag the mouse pointer downwards around the required area while still holding down the Alt key.

The text will be selected vertically.

After you select text vertically in Word 2007, you can make it bold, underline, italicize, delete, cut or copy it. You can also paste it anywhere else in the document if you want.

This feature which allows you to select text vertically in Word 2007 is very useful while working with lists. 

Some Tricks in Excel - MS Office

* Generate Random NumbersNeed to create random numbers? You can do it in Excel. 
To generate a number between 0 and 1, type =RAND() in a cell.
To generate a number between 1 and 100, type =RAND()*100.
After entering, use the fill handle to quickly populate as many cells with random numbers as needed. To use the fill handle, click the cell, move your pointer over the lower-right corner of the cell until it turns into a black plus sign, and drag it horizontally or vertically across the cells you wish to populate. The cells can then be formatted as desired.

* No Formula, PleaseWhen copying and pasting a cell that contains a formula, use the Paste Special feature. First, copy the cell (Edit...Copy). Next click in the desired location and click Edit...Paste Special. Choose Values to copy the number only and not the formula. 

* Insert Time/Date in ExcelTry these keyboard shortcuts to insert the time/date in an Excel spreadsheet:
Current date: Press CTRL+SEMICOLON
Current time: Press CTRL+SHIFT+ SEMICOLON
Current date and time: Press CTRL+ SEMICOLON then SPACE then CTRL+SHIFT+ SEMICOLON

* Hide Worksheets in Excel 2002To hide Excel worksheets to prevent unwanted changes, Select the worksheet, click Format...Sheet...Hide.

* Color-Coding Excel Sheet Tabs in Excel 2002In Excel 2002, color-code sheet tabs for easier identification or grouping. 
Select the sheet(s) by holding down the CTRL key and clicking the tabs.
Click Format...Sheet...Tab Color. You can also right-click the sheet tab and choose
click Tab Color.

* Pasting an Excel Table and Its Formatting into WordIn Excel, select the table and click Edit..Copy. Switch to Word, and click where the table will be located. Click Edit...Paste. Using the Paste Options smart tag, select one of the following options: To keep the formatting, select Keep Source Formatting. To automatically keep data updated as it is updated in Excel, select Keep Source Formatting and Link to Excel. To match the style of another table in the Word document, select Match Destination Table Style. To link the table instead of copying it, select Match Destination Table Style and Link to Excel.

* Go ToTo search for specific cells, such as ones that have formulas or ones that just contain values, use the Go To feature. Click Edit...Go to...and choose the desired feature.

* Shortcut KeysTo see a complete list of shortcut keys in Excel, press F1 on the keyboard and type shortcut keys in the search box. 

* Customizing ToolbarsRight-click on any toolbars and click the customize the toolbar. Click the Command tab, select the desired category, and click and drag new features from the right command box to the toolbar.

* Quick GraphsWant to create a quick graph? Click anyway in the Excel data on the spreadsheet, press F11 key and presto! Right-click in the graph border to change the type, location, or data.

* Basic Keyboard ShortcutsF1 Help
F2 Edit current Cell
F5 Goto
F7 Spell Check
F12 Save file as
CTRL + A Select entire worksheet.
CTRL + B Toggle Bold Text.
CTRL + C Copies the item or items selected to the Clipboard and can be pasted using CTRL + V.
CTRL + F Displays the Find dialog box.
CTRL + H Displays the Replace dialog box.

Thursday, 11 October 2012

IBM Exascale Future Super Computer To Store 1500 Petabytes Per Year


Despite everything that’s known and theorized about space, anyone can tell that the information is just a fraction of what’s really out there. Getting the answers is the main goal of ASTRON, the Netherlands Institute for Radio Astronomy, when it called for IBM’s help in creating a supercomputer.


Why a supercomputer? Why not a satellite or a telescope? Because a telescope already exists- it’s called the Square Kilometer Array or SKA, a square kilometer of flat land full of antennas that reach the millions. While it’s still in development, it will never be able to look into the far reaches of outer space if the 20 funding countries don’t find some way of getting something capable of creating the processing power the SKA needs to work, and this is where ASTRON and IBM’s collaboration comes in. It’s called DOME, named after the Swiss mountain and the covering over telescopes, and it’s basically an exascale computing machine that will be a hundred times faster and more powerful than the fastest supercomputer to date, Fujitsu’s K computer, a petascale running at 10 petaflops.

For those who don’t understand technical jargon, FLOPS is short for floating-point operations per second, the measurement of a computer’s performance. Petascale computing is the next step up from terascale and a step below exascale, which is far more than what normal PCs can boast as they’re only at gigascale computing. A better analogy was presented by IBM- imagine that the daily traffic of all the computers in the world is doubled, and that will be the rough estimate of DOME’s own daily output.

With DOME, scientists can analyze, run and store the huge amount of data that the SKA will receive with its square kilometer of antennas that collect radio waves, which is expected to amount to a few exabytes per day or about 1500 petabytes per year. Obviously, borrowing or replicating Fujitsu’s toy for the project is out of the question.

Of course, creating DOME will not be an easy task for both ASTRON and IBM, so they’ve launched a five-year collaboration to create the supercomputer before 2024, the year the SKA is supposed to be finished. If they get this done in time, and the two work as expected, it might not be long before we find out if there really is other life out there.


Breath powered USB charger


Are you breathing? Do you have a gadget that can be charged via a USB port? Well if you answered yes to both, then you are in luck. This instructable shows how to make a device that will charge your USB-capable devices while you do what you do best. Breathe. Using some parts scavenged from an old CD-ROM drive, a simple electronic circuit, and a few rubber bands you will soon be huffing and puffing your way to fully-charged pseudo-useful electronic gadget nirvana.

Introduction and Step 1


This project requires a wide range of "maker" skills, such as PCB board manufacture, dismantling of electronics, cutting and drilling plastics, mixing epoxy, designing a gear train, kludging together a bunch of parts, bending paper clips, and risking the well being of your ever so expensive phone, camera, or PDA. All in all, good fun.

Since everyone will have a different collection of junk parts to build this from, I will just give you a detailed overview of how I went about it and you can apply these ramblings to your own project. Which will consist loosely of four steps.

1. Scrounge up some suitable parts for the generator
2. Build the charger circuit
3. Assemble the generator, thorax coupler, and mechanical return
4. Connect the charger circuit, and test

Step 1:

I had about four old CDROM drives hanging around and took apart a few of them to see what cool parts were inside. Turns out there are lots of cool motors, gears, and other parts inside that fully validate my insistence of keeping such crap laying around. Seeing the gear trains inside these units used for opening the tray gave me the idea for this project. The small low-torque, high-RPM motor is linked to the tray via a gear train that has a final ratio of about 20:1 Previously I had been using a parallel array of tiny pager motors to generate electricity from breathing (see below) but the linear travel from your chest expansion is not that great (around an inch) so in order to generate useful voltages you had to really huff and puff.

Anyway, tear into those CDROM drives, which you can find at pretty much any garage sale, thrift store, or landfill. The pic below shows the results. Lots of potential projects in there. For now, we are only interested in the plastic gears and the motors for opening the tray and/or moving the laser carriage.

Look over the various gears and drives and try to visualize a way to add additional gears to increase the gear ratio, or how to add another motor in series. You want to minimize the changes to the gear train. Alternatively you can just scavenge all the gears and build your gearbox up from scratch.

You are also going to need at least one motor with a small gear or pulley on it so that you can connect it to the gear train. The motors in the CDROM drive are typically simple permanent magnet DC motors designed to run on 5V, except for the spindle motor, which you don't want to use anyway.

At this point you also want to think about what you are going to use for a strap to go around your chest. An old belt, some webbing, an old shoelace, a name badge strap, or anything that will fit around you comfortably without any stretch to it. You want all the expansion to take place in your linear generator. Any stretch that occurs in your thorax coupler will be wasted energy.

Step 2 - Build the charger circuit


The charger circuit is pretty simple. It consists of:

1. A diode bridge to turn the AC voltage from the generator into rectified DC.

2. A rechargeable battery to level out the voltage and hold excess generated power when nothing is hooked to the USB port. You could use a big capacitor too, but batteries offer a more predictable voltage level.

3. A boost converter to bring the low voltage up to 5VDC for USB charging

4. A USB plug.

I've drawn up the circuit in EAGLE, a program that I highly recommend. You can download it for free from cadsoft.de. The schematic and single layer board layout are attached. The actual use of EAGLE and the board manufacture are beyond the scope of this instructable. Many great instructables are out there to cover these topics.

The parts list for the charger circuit (quantities in bold):

1x L6920 Adjustable output step up DC converter (1V minimum input, Datasheet here)
Digikey# 497-4593-1-ND

4x 1N4148 switching diodes (I used tiny SOD523 smds, but you can sub in what you have handy)
Digikey# 1N4148WTDICT-ND

2x 10uF ceramic or other low ESR capacitors (I used 1206 smds)
Digikey# 39901299-1-ND

2x 100k thin film resistors
Digikey# P100kFCT-ND

1x 10uH wirewound inductor
Digikey# 490-2519-1-ND

1x USB female Type A smd connector
Digikey# AE9924-ND

Above you can see the schematic and board files, and jpegs of them as well. The tough part is making a good PCB in your kitchen that has traces small enough for the TSSOP package of the L6920. As you can see in the pic, I made 4 boards at once since each is so small.

The trick to putting it together is to start in the middle and move your way out, begin with the L6920, and add the SMD discretes as you go. A pair of tweezers is essential, along with good eyes or a magnifying glass, bright light, and a steady hand. Don't worry about getting too much solder in there, use your solder wick to clean up any accidents, and check your work with a multimeter after every step. Practice makes perfect.

Step 3 - Build the generator


Now you need to make the generator. You should play around with the gears and motors until you get a satisfactory arrangement. You will want to use a multimeter on the motor while turning the gears to see how much voltage you are getting. You want to get in the 2-3 volt range while moving the linear gear slowly about an inch in travel. When setting up the gears, you want to use the ones that have a large gear molded with a smaller gear. Stacked in series these will give you a good gear ratio as shown in the drawing. (ignore the fact that the teeth are the wrong size in the drawing, I was too lazy to redraw with matching tooth pitch) You should shoot for somewhere in the 25-50:1 range. More is better but eventually the losses in the gear train pile up and it get too hard to turn the motor and the gears will strip.

One of the keys is to find a way to use the linear gears on the CD tray or other piece to turn your breathing motion into rotation of the DC motor. I included a pic of another prototype version of the CD drive generator where you can see the linear tray gear clearly. Also visible are the cut marks in the plastic. This prototype was also capable of lighting the LED array pictured. Don't be afraid to chop this thing up to suit your needs.

In the other pic the DC motor is mounted in place in the plastic of the drive I cannibalized. Near this was a linear slider that I used to couple the breathing motion to the gear train. I also added another gear (see pic) to the drive train in order to increase the ratio and to allow mounting another motor in the future to increase output. The main challenge is to effectively get the breathing effort translated into rotation of the motor efficiently.

Step 4 - Put it all together and test it out


Once you have a satisfactory generator setup, then you want to connect the generator to the charge circuit, insert the battery, and use your multimeter to test the output voltage at the USB port. If you don't see 5V then there is a problem. Fix it before plugging your pricey gadget into the USB port.

Below you can see my assembled breath powered USB generator in all its glory, top and bottom. You can see the rubber band used for return, along with the linear gear carriage, the strap and the paper clip I used to connect the linear gear to the strap. The key here is to have all motion transferred to the linear gear so you want the strap and connection method to be stiff with no give. The strength of the rubber band or spring return is up to you. My half-assed experiments indicate that you can pretty much handle a 1N force without feeling too labored in your breathing. Ideally you want as small a rubber band as will return the linear gear to the starting position when you exhale. If you get enough generating capacity either through high gear ratio, extra motors, or a bigger motor, then you will need a bigger spring return. Essentially you are storing mechanical energy during your inhalation that is used to turn the generator on the exhalation so that you can generate on both push and pull. You need the diode bridge to successfully take advantage.

So I strapped on this monstrosity and hooked it up to my trusty data acquisition box from DataQ. Attached is the voltage plot output of the generator before step-up conversion to the 5V USB. Basically the battery runs the step up converter and the breath generator charges the battery. In the plot you can see the leveling effect of the battery, with the voltage spikes when I was breathing. Actually I was approaching hyperventilation, but in the name of science. The results can be seen in the photo of the phone charging. One thing to mention is that I had to modify a USB cable to get the RAZR to charge as detailed on this website. I don't have any solid numbers on the power I was generating, I haven't come up with a good way to measure that yet.

Typical resting metabolism is on the order of 50-75W of which a substantial portion is due to breathing effort (I have seen north of 50%). So if we assume 25W continuous energy used for breathing, it seems reasonable that we could increase that 4% to harvest 1W for charging a cell phone. Based on my cell phone, and these assumptions it would take about 3 hours to charge the 3.7V 800mAh battery. Assuming 100% efficiency.

Sadly, based on the few measurements I was able to make, the breathing generator I built is putting out more like 50mW. Way to breathe no breath. It would charge the phone, but the NiMH battery would be doing most of the work until it was drained. Then you would have to breath for a day or so to recharge the NiMH battery. You were planning on doing it anyway right? So there is room for improvement. One area I am looking into is using carbon nanotubes and polyurethane to make an electroactive polymer generator. This is the type of technology that is being used to make boot-strike generators for the military.

Future improvements could get this device into the 1W range. Specifically, using a better DC motor (higher voltage per rev) and custom building the drivetrain to be more comfortable and better coupling to breathing motion.