Thursday, 1 August 2013

Collection of Keyboard Shortcuts for All Browsers

There Are Many Common Keyboard Shortcuts That Can Be Used In all Browsers, Whether You are using Google Chrome, Mozilla Firefox, Opera, Safari or Internet Explorer. I Use Keyboard Shortcuts , It Helps Me to Accomplish Many Tasks In Comparatively Less Time.


Following are Some Keyboard Shortcuts That You Can Use on Any Browser.

Managing Tabs


Ctrl+1-8 – Switch to the specified tab, counting from the left.

Ctrl+9 – Switch to the last tab.

Ctrl+Tab – Switch to the next tab – in other words, the tab on the right. (Ctrl+Page Up also works, but not in Internet Explorer.)

Ctrl+Shift+Tab – Switch to the previous tab in other words, the tab on the left. (Ctrl+Page Down also works, but not in Internet Explorer.)

Ctrl+W, Ctrl+F4 – Close the current tab.

Ctrl+Shift+T – Reopen the last closed tab.

Ctrl+T – Open a new tab.

Ctrl+N – Open a new browser window.

Alt+F4 – Close the current window. (Works in all applications.)

Managing Tabs With Mouse


Middle Click a Tab – Close the tab.

Ctrl+Left Click, Middle Click – Open a link in a background tab.

Shift+Left Click – Open a link in a new browser window.

Ctrl+Shift+Left Click – Open a link in a foreground tab.

Navigation


Alt+Left Arrow, Backspace – Back.

Alt+Right Arrow, Shift+Backspace – Forward.

F5 – Reload.

Ctrl+F5 – Reload and skip the cache, re-downloading the entire website

Escape – Stop.

Alt+Home – Open homepage.

Zooming


Ctrl and +, Ctrl+Mousewheel Up – Zoom in.

Ctrl and -, Ctrl+Mousewheel Down — Zoom out.

Ctrl+0 – Default zoom level.

F11 – Full-screen mode.

Scrolling


Space, Page Down – Scroll down a frame.

Shift+Space, Page Up – Scroll up a frame.

Home – Top of page.

End – Bottom of page.

Middle Click – Scroll with the mouse. (Windows only)

Address Bar


Ctrl+L, Alt+D, F6 – Focus the address bar so you can begin typing.

Ctrl+Enter – Prefix www. and append .com to the text in the address bar, and then load the website. For example, type Geekofreak into the address bar and press Ctrl+Enter to open www.geekofreak.com

Alt+Enter – Open the location in the address bar in a new tab.

Search


Ctrl+K, Ctrl+E – Focus the browser’s built-in search box or focus the address bar if the browser doesn’t have a dedicated search box. (Ctrl+K doesn’t work in IE, Ctrl+E does.)

Alt+Enter – Perform a search from the search box in a new tab.

Ctrl+F, F3 – Open the in-page search box to search on the current page.

Ctrl+G, F3 – Find the next match of the searched text on the page.

Ctrl+Shift+G, Shift+F3 – Find the previous match of the searched text on the page.

History & Bookmarks


Ctrl+H – Open the browsing history.

Ctrl+J – Open the download history.

Ctrl+D – Bookmark the current website.

Ctrl+Shift+Del – Open the Clear Browsing History window.

Other Functions


Ctrl+P – Print the current page.

Ctrl+S – Save the current page to your computer.

Ctrl+O – Open a file from your computer.

Ctrl+U – Open the current page’s source code. (Not in IE.)

F12 – Open Developer Tools. (Requires Firebug extension for Firefox.)

I Hope these Shortcuts will Help you Now and in Future. Stay Connected :) .
If any Of the Above Shortcut is not Working on Any Browser or if there is a Shortcut That you know and You Think is Missing In the Above list, Then Feel Free to Comment below. 

Find IMEI Number of a Lost Android Phone

As you probably already know, an IMEI number or the International Mobile Equipment Identity number is a 15 digit number which can be used to identify any mobile device uniquely. You can easily find the IMEI number of your mobile phone if you have it tight now, just dial *#06# and you will see it.
You should always write down the IMEI number of your mobile phone at a safe place. This is because if you ever loose your phone or if its stolen, you will need to use its IMEI number to track and find your lost or stolen mobile phone.
But what if your Android phone is already lost and you don’t have its IMEI number? Don’t worry, you can still find the IMEI number of your Android phone.
The first thing you may have done after buying your Android phone is adding your Google Account to your device. And you probably don’t know, but when you add your Google account to your Android phone, it saves all the details about your phone in its database, including the IMEI number of the phone. You can retrieve the IMEI number of your lost or stolen Android phone from your Google account easily.
Just sign in to your Google Dashboard, and scroll down a bit to find the ‘Android devices’ section. Here, you will see a list of all Android devices that you have used in past to login to your Google account, including your lost or stolen Android phone.

Find your lost Android phone in this list and click on ‘More data stored about this device’ option. You will immediately see the IMEI number of your lost or stolen Android phone.

Saturday, 27 July 2013

How to Use Internet on Computer via Android Phone

Hello, Today i Will Share a Trick by Which you can Use your Mobile Internet on your PC by just connecting both with USB.

Android Phones have become more Common and Famous Now a days, With Android Comes a Feature Called " Tethering " .

Tethering Allows us to use internet from your Android phone to your PC, So If you have a PC but don't have internet Connection, or Your Internet Connection is Disabled due to Any reason and have Internet Access on Your Android Phone, Then You can Tether Your android phone with your PC and start Using Internet. 

For your Better Understanding  i will show you Steps on how to Use this " Teather " Feature. 

Requirement : 
  1. Android Phone. 
  1. USB Cable.
How do I use my Mobile's Internet on my PC ?
Many tethering apps are available but here we will use " Tether " to tether your Android phone with Pc 
Step 1:  First of all Click here To Download Tether From the official site.

Step 2: Do not run Tether , first Connect Your Android phone with USB Cable, Make sure USB Debugging is Enabled on Your Phone.

Enable USB Debugging by navigating to Setting > Applications > Development > Tick usb Debugging.

Step 3: Now Run Tether.exe, while installing it may ask you to confirm a couple of time, Click yes and Trust. While installing Tether on your pc it will also install tether on your Phone, so Make sure your Mobile is Connected to your PC.

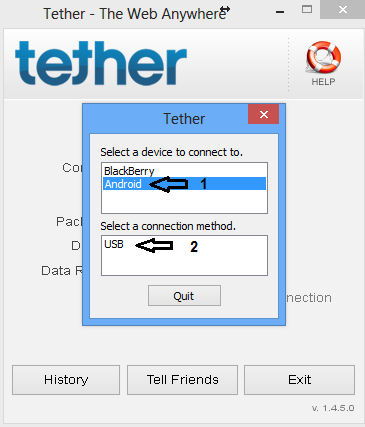
Step 4:  Once its installed, open Tether, click on Android and then USB just below it.


Step 5: Once It shows Connected to Android, You Can Launch your Favourite Browser and start Using Internet. 


 I have an easy method to do all that alternative to the above method.

In this method we will use " Easy Tether " Which You will have to download On your Mobile and not on your PC.


Step 1: Goto Google Play Store and Search For Easy tether, Download the Free Version on your Mobile.

Note: In Free version You won't be able to access websites which has secured connection. ie : https: 
So you cant access Facebook And Google, Which i Think is Most usefull. But you can buy full version of Easy Tether which costs around 9$ and enjoy all Websites.

Step 2:  After you download Easy Tether, Install it. Next step you will have to Install Easy Thether Drivers on your PC, Which Can be Done Here.

Step 3: After Download the Drivers  You will see a Tray Icon. Now Connect Your Android Phone With USB Cable,Enable USB Debugging, Then Goto the Tray Icon, Right Click on it and click on Connect Via Android.


Thats it, you will See Connection Established, Start Using Internet now.

Stay Connected For More Tricks :)

Thursday, 25 July 2013

Kite patch is claimed to make you "invisible" to mosquitoes

A proprietary blend of FDA-approved non-toxic ingredients within the patch exudes a scent that reportedly blocks mosquitoes’ ability to detect exhaled carbon dioxide

Depending on what part of the world you live in, mosquitoes can range from being an annoyance, to acting as carriers of life-threatening diseases such as malaria and West Nile virus. Sprays containing deet do a fairly decent job of keeping the mozzies at bay, but they’re also highly toxic. Less-nasty sprays, bracelets and other devices are also available, although (as I can attest to from personal experience) they tend not to be very effective. Now, however, a group of California-based entrepreneurs are developing what could be the ultimate deterrent – the Kite Mosquito Patch.

The Kite Mosquito Patch is worn on the clothing like a decal, and is said to keep mosquitoes from detecting your presence for up to 48 hours
Each disposable square patch measures just 1.5 inches (38 mm) per side, and is simply stuck onto the clothing like an adhesive decal. A proprietary blend of FDA-approved non-toxic ingredients within the patch then exudes a scent, that reportedly blocks mosquitoes’ ability to detect exhaled carbon dioxide – that’s the major method by which the insects track down their human prey.
Once exposed to the air, the patch remains effective for 48 hours.
The Kite is based on research that was initially carried out at the University of California, Riverside, where it received funding from the Bill and Melinda Gates Foundation and the National Institutes of Health (NIH). The company that was founded to develop the patch has also benefitted from an NIH grant, along with grants and collaborative agreements formed with other organizations.
Initial large-scale testing is planned to take place in Uganda, where disease-carrying mosquitoes are a major health issue. Ultimately, it is hoped that Kite patches will be widely available both to aid organizations, and to consumers around the world. It would be interesting to see if a patch worn on the shirt, for instance, is reallyeffective at keeping mosquitoes away from one’s legs and feet..

The Kite patch's active ingredients being tested in a lab
The Kite group is currently raising finds on Indiegogo, and has proven very successful. The funding goal of US$75,000 was met in just four days, with the total currently sitting at approximately $236,000. There’s still plenty of time to take part, however. A pledge of $10 will send a pack of five Kites to a family in Uganda, while $35 will send 10 patches and also get you 10 of your own. An estimated retail price has yet to be established.
More information on the Kite patch is available in the pitch video below.
Sources: KiteIndiegogo

Wednesday, 24 July 2013

BlackBerry A10 leaked pictures

Want to see what BlackBerry's upcoming high-end handset, dubbed the A10, will look like? According to VR-Zone, the leaked pictures show the handset's front and back sides. The pictures show a large 5-inch display on the A10. Other than this, however, there’s not much to see, since, the handset appears to follow the same design principle as the Z10. It is also a general consensus that the handset will be launched running BlackBerry 10.2 out of the box.


The large 5-inch display

Earlier this month, specifications of the handset had been leaked. And the information looked like it was a slide taken right off a BlackBerry presentation. One of the stand out new feature that we can see in the A10 is the massive battery. With 2,800 mAh of juice, the phone should have a fairly long battery life despite the larger 5-inch display. Other than this, we can now also see that the A10 measures 140.7x72x9.4 mm. However, the Verizon-only variant of the A10 seems to be thicker, measuring 9.7mm.


Cell Phone coverage

See the Actual Signal Strength on Your iPhone or Android

Ever feel tricked by your phone's signal bars into thinking you have a better reception that you actually do? This simple hack will transform those bars to show the actual signal in decibels (dBm). No jailbreaking is required and it's reversible.

Here are the instructions from TechGlitz:
Step 1: Dial *3001#12345#* on your iPhone then press Call.
Step 2: You'll now enter Field Test mode. You'll notice a signal strength indicator on the upper left hand corner of your screen. You can toggle between signal strength bars and a number by simply taping on it. At this point, press the home button to exit the app or if you would like the feature to be permanent, continue on. Don't worry, the process is completely reversible. 
Step 3: Hold down on the Power button until you see the ‘slide to power off' bar. Do not power off the device. 
Step 4: Press down on the Home button until the app closes and you return to your home screen. 
That's it. Even when restarting the iPhone, the signal strength can be toggled between bars and numbers. The closer your number is to zero, the stronger your signal is.
The lower your number, the stronger your signal—but don't include the - sign when evaluating (so, if the signal says -60, that's better than -90). 
To return to the default bars permanently, follow these steps:
Step 1: Dial *3001#12345#* on your iPhone then press Call.
Step 2: Press on your Home Button once.
This trick may come in handy when you're in a dead zone and need to know where to move to for a better signal. (If you're constantly suffering from poor signal woes)

By the way, Android users can take a look at their dBm number under Settings > About Phone (it may be under Network or Status, depending on your phone).

Wednesday, 17 July 2013

Trick to Speedup Pendrive for Faster Data Transfer Rate

Guys You must have Experienced That the Speed of Your Pendrive has Slow Down After Few Days Of Usage. So Today I will Show You some Effective Tricks to Speedup your Pendrive Data Transfer Rate.

First Thing First, Your pendrive Data Transfer Rate Depends On Some Factors Like :

1. Age of your Pendrive:

As i Said, When You buy a New Pendrive it works Fast but as it gets older, The Data Transfer Rate Starts Decreasing.

2. Types of Files :
Data Transfer Rate Depends on Types of Files You are Transferring. Songs, Docs, Videos May get Transferred very Quickly.

3.Location of Files :

Data Transfer Rate also depends on Locations of Files. If you want to transfer a bunch of files to Same Drive But another Folder then it will get Transferred very Fast. But if You want to Transfer Files from one Drive to another then it will Take some Time Comparatively. Likewise in Pendrive.

4. USB Port Version:

USB Port Version 2.0 is Most popular and the computers which are manufactured after year 2000 Have 2.0  Usb port Version. This version of USB port give you the Speed of 35mbps (Theortically)
How to Speedup your Pendrive For Faster Data Transfer:

We will Change The File System To NTFS of your pendrive and Also We will Change the Device Policy inorder To Speedup your Pendrive.

Follow Below Steps 

1: Plugin your Pendrive, Right click on your pendrive and select Format (You will Loose All your data in your pendrive so better Take a backup) Then,Select NTFS File system, Uncheck Quick Format And Click On Start.

Note: We Are Changing The File system to NTFS Because FAT 32 Can not Handle Large amount of data
2: After Formating Your Pendrive and Converting it To NTFS file System, Its now Time to Change the Device Policy.

Now Again Goto Your Pendrive Properties , click on  Hardware Tab. Select Your Usb Device from the list and click on Properties .


After Clicking on Properties You will see a new Dialog Box,Click on Change Settings, Another Dialog Box will appear.

Note :  Understand That After Changing the Device Policy , Your Data Transfer Speed Will Increase But Make Sure You Click on " Safely Remove Hardware and Eject Media"  Before Removing Your Pendrive.
Click on Policy Tab and Select Better Performance, Click ok .

Thats it. Restart Your Computer